A Mess Free Life may collect a share of sales or other compensation from the links on this page.
Oh, the good old pantry, great for storage but a nightmare to maintain! Pantries are notorious for being overcrowded, messy, and almost impossible to keep clean. It is in our nature to see open spaces and wants to fill them up with clutter. It is a subconscious reaction. Well… that is my excuse for letting my pantry get out of control anyway.
Let messy pantries be a thing of the past as we have discovered a method for organizing a pantry with deep shelves and better yet, can help you keep it tidy for good. Follow these very simple rules to reap the rewards of an organized pantry.
Read Related Article: Storage Space Solutions
Table of Contents
Each Shelf Has a Purpose
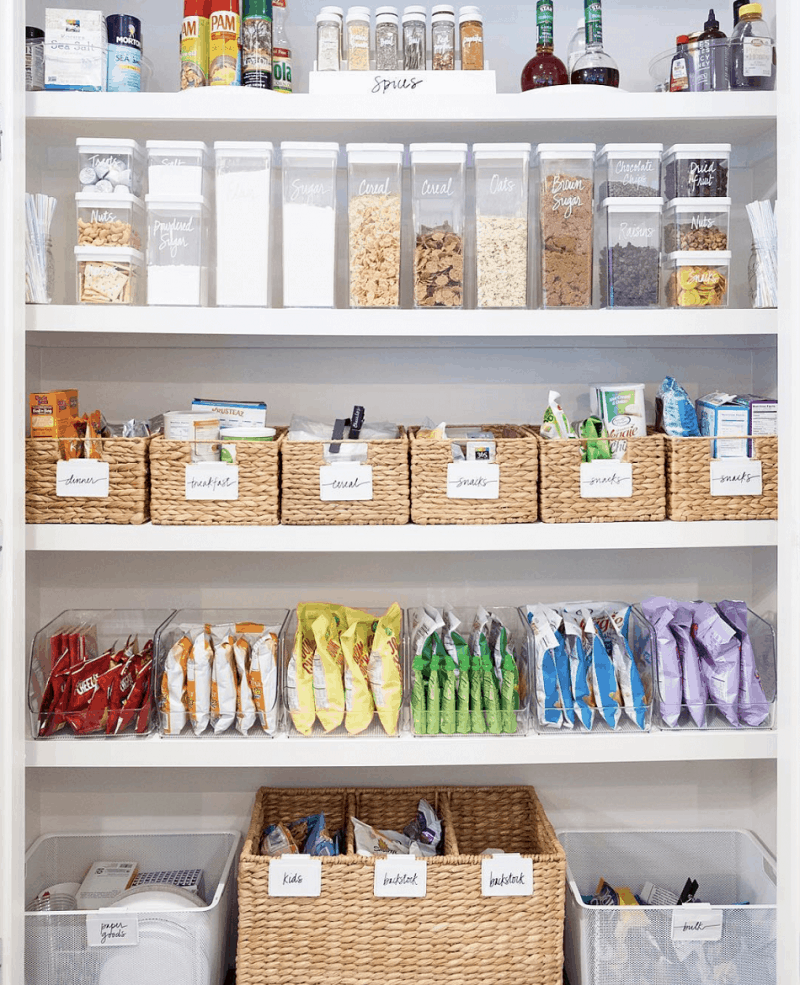
Keeping a theme within every section of the pantry stops items from getting lost or misplaced. For example, have a shelf for adult breakfast, kids breakfast, tinned food, kids snacks, adult snacks, and anything else you may have. Separating the children’s things from the adults even though it comes under the same category (i.e breakfast) makes it accessible for the kids when you are unavailable to help them.
As you organize the shelves into sections, you’ll come across items that do not fit into any category, or it is so specific that it would need a section of its own. These items are probably of no use to you on a daily basis, and may not even have been used in the last few months. These are the items you should get rid of. I’m sure there is a neighbor or a friend that will benefit from it much more than you, so give it away where it can be put to good use.
Grab and Go
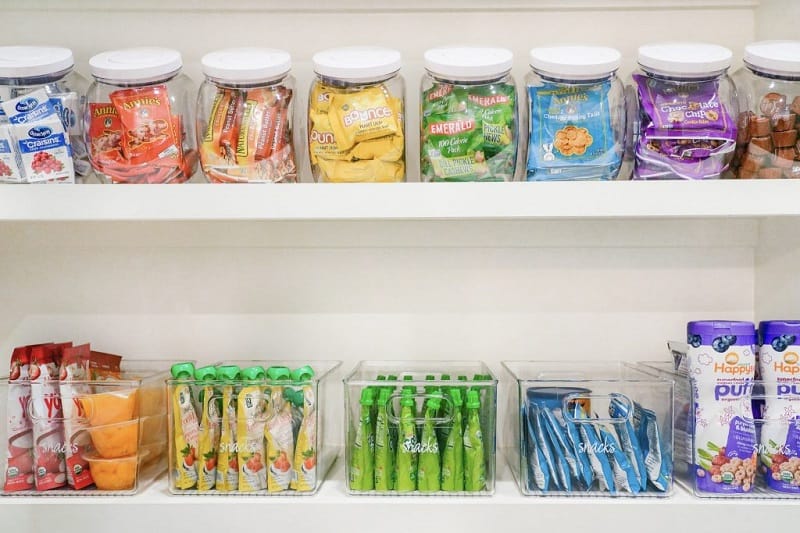
For each section, have a little corner that is labeled ‘grab and go’. Grab and go items are things like fruit bars for the kids, energy bars for the adults, little individual packets of food for work or school, nuts, basically, little bits and bobs that can be eaten on the go. Again, the adult and kids ‘grab and go’ items should be kept separate.
You are probably thinking ‘how on earth am I going to organize a grab and go section in my pantry, especially when the shelves are so deep?’ We thought the same thing until we tried out a few different ways and picked the winning method. Here is how to make a ‘grab and go’ section that is easy to access and keeps the items visible:
- Take all of the small multipack items out of their boxes. There is nothing worse than having a big bulky cardboard box in the pantry that only has two or three little items in it. Getting rid of the multi-pack boxes will show you exactly how many cereal bars or other snacks you have left.
- Invest in some tiered high-to-low plastic open top boxes so that you can have all of your snacks and ‘grab and go’ items on display right from the back of the pantry to the front. If you are struggling to get hold of tiered snack organizers you can create your own.To make a tiered snack organizer, purchase three boxes of different height/depth (or however many fit the depth of your pantry) and place the deepest one on a small box or a few pieces of cardboard to elevate it. Put the other boxes on fewer and fewer pieces of cardboard until you reach the box at the front that should sit directly on the pantry.
- Seperate the healthy snacks from unhealthy snacks. It might be a good idea to have yours and the kids unhealthy ‘grab and go’ items on the top shelf out of sight.
- Items that are not pre-wrapped such as nuts and seeds should be poured out into clear containers. Put the containers with the nuts and seeds or similar snack items at the back of the pantry. In front of these items, place little individual plastic boxes so that you can mix and match the contents of the containers and it is all there ready for you to use.
Kids Shelf
The kiddie shelf should be on one of the lower levels of the pantry so that the kids can help themselves to their foods. This gives them a lot of responsibility and is a lot more important to their learning process than you think.
Letting the children have complete access to their food allows them to practice self-control, gives them the opportunity to help you prepare their meals, and creates responsibility. In order to have the privilege of accessing all their snacks, they must keep their area tidy. If it doesn’t do all of that for your child there is still a silver lining, at least they don’t call your name every time they want something from the pantry!
Keep the kid’s pantry section colorful so that the sections are color-coded and easier for the kids to understand the layout. In this case, not all of the children’s multipack items should be out of a box. Instead, place multipack items in a tall plastic container at the back of the pantry and have just a few of the contents in a box in front-accessible and on display.
Having a deep pantry means that they won’t be able to get to the back of the pantry and get more items out of the box unless you want them to. Leave a lot of empty space in the kid’s section wherever you can.
You don’t have to use standard square or rectangular boxes either. Play with materials such as plastic and wood, shapes and sizes for the kid’s shelves.
Adult Shelf
The adult-only shelf should be out of reach of the kids, but comfortable for you to rummage through and access, so about shoulder level is perfect. When we talk about the adult pantry, we are referring to all of the things you would use on a daily basis. These items may seem random and out of place, but they are the most useful to you.
The easiest way of arranging these items is to have them in ‘breakfast’, ‘lunch’ and ‘dinner’ baskets. Dinner can be the deepest basket, followed by lunch in the middle and breakfast at the front. Next to these boxes have your adult ‘grab and go’ section. Makes sense right?
Storing Small Items
Until now, we have focused on keeping everything very visible so that we don’t have to rummage around for things. But what about the little fiddly items we keep in pantries like small baking powder sachets and spices?
Spices should be alphabeticalized and put into a long, rectangular box, preferably the depth of the pantry. I like clear boxes for spices as they are such beautiful colors and liven up the pantry.
Other small bits and pieces should be kept in trays or boxes that are appropriate for the size of the content. Ingredients that you don’t use so much should be put to the back of the pantry in a labeled container. You can get trays that wheel out of the pantry for these shelves so that you aren’t constantly emptying the shelf just to get to the box at the back.
Top Tip: label boxes in the pantry will avoid confusion.
What to Keep Visible
Little sachets and similar items should never be visible. For one, the packaging will get damaged over time if you leave paper sachets and fragile boxes unprotected. Having these items out of a box looks very messy, no matter how well you arrange it.
These kinds of items are best kept in an opaque box so that the contents can’t be seen through the box either. Having a ‘bits and bobs’ section in the pantry for these items is great, put the boxes on a roll-out tray and there you have it!
Importance of Empty Space
Empty space is key to keeping the pantry looking organized. This is dangerous territory as you will be tempted to fill the empty space with more and more things. How do we maintain empty space in the pantry? By only filling the containers and trays you originally placed in the pantry, do not add more. If something is full, then you don’t need more of it for now.
Stack From High to Low
It doesn’t make sense to put tinned food in a box or drawer as they are very bulky. To see what you have in the pantry, stack the tins in a pyramid from high at the back of the pantry to low at the front.
Non-Food Item Storage
We often don’t have enough space in the kitchen cupboards for all of the pots, pans, and silverware in the house. Pantry to the rescue!
Dishes and Silverware
I can understand having ‘best’ or special occasion dishes and silverware at home for family gatherings and holidays, but your everyday dishes should be kept to a minimum. Why not purchase a set that isn’t part of the seasonal collection in your favorite store, that way when something breaks, you can get the replacement and are confident it hasn’t been discontinued.
The bonus of having deep pantry shelves is that you can fit plate racks in them without a problem! Stack the special occasion dishes at the back of the pantry shelf, and at the front place a plate rack and arrange your plates and bowls accordingly.
Pots and Pans
Minimize the pans you have altogether, let’s face it, most pans are multi-purpose anyway. Stack the pots and pans up without their lids and arrange them from large to small. The lids can be put on a plate stand to stop the glass chipping.
Top Sorting Tips
Never allow the pantry to get that messy and overcrowded again! Tidying up the pantry won’t be such a big hassle if you keep on top of your pantry organizing duties. Pantries shouldn’t be organized once in a blue moon because that is when it becomes an enormous job.
Rejigging the pantry once a month will only take about 30 minutes and keep everything orderly. This will remind you of the things you have and stop you from doubling (or tripling) up on the same things by spending your hard-earned dollars on items you already have.
Think about the following points when you do your monthly ‘pantry jig’:
- Just because you have a lot of space in your pantry, doesn’t mean you should fill it to the max. Less is more and leaving some room between items makes it look much tidier.
- Only keep items you really need. The majority of people store plenty of ‘just in case’ items in their pantry such as cake tins and cupcake holders, but what is the point if you aren’t really a baking kind of person? These items just create chaos and mask the rest of the useful items you have in the pantry.
- Do a monthly pantry check. Doing this will refresh your mind on the items in your pantry and remind you of what you truly are missing, and what you have in store at the moment. As you are doing this, check the dates on the food items so that nothing that has passed its expiry date remains.
- When arranging your pantry, start with the bottom shelf first, then work your way up to the top.
- Before emptying the entire contents of the pantry, have a rummage through each shelf and get a feel for the items you have in the pantry as a whole. Break the items up into sections and visualize how you want the pantry to look before you start.
- Have a ‘donate’ bag next to you at all times when you are organizing, that way you remind yourself not to hoard anything unnecessarily.
We would love to know about your deep shelf pantry organizing techniques too. Let us know if any of these techniques worked for you or if there is anything we have missed out!
